For my iSignif project I wanted to implement restricted access functionality for premium account. The ultimate goal is for the user to subscribe to a premium account in order to access certain pages.
In order to implement this functionality, we first analyzed the need. The expected behaviour is as follows:
- the customer benefits from one month of discovery of our tool as soon as he registers
- once his balance of premium days is exhausted, he receives an email indicating that he will have to buy back days
- the user updates his balance by making a on-time payment which adds one month to his premium balance where he takes out a subscription which will make a automatic payment at the beginning of each month
In order to implement this, I quickly went through the existing payment solutions (PayPal, BNP, etc...). It turned out that Stripe was the best compromise.

Stripe is an American company that aims to simplify online payments. Created in 2010, Stripe now weighs more than 10 billion!
I chose Stripe because its advantages are:
- the customer can pay without having an account opened at Stripe
- the rates are quite "reasonable" (1.4% + 0.25€ per transaction for European cards)
- the ease of implementation because, in addition to offering a beautiful API, Stripe offers libraries for the most commonly used languages (PHP, Pyhton,Ruby, Java and even Go
- an excellent documentation
In addition, Stripe goes much further than a simple payment solution since it offers a whole ecosystem to manage customers, invoices, products, etc....
In this article I will therefore retrace the development of the functionality by trying to be as generic as possible. I also specify before starting that it is not a sponsored item and I did not receive any money from Stripe (I would have liked...).
TLDR: Stripe is very simple to set up and really allows us to completely delegate payment management. This allows you to focus on your business and is invaluable for a project that is just beginning.
Table of content
- TOC {:toc}
Implementation of the premium mode
In this first part I will talk to you about the implementation of the premium feature. Here we will just code the expected behavior without touching Stripe for the moment (be patient...).
Modifying User model
We will therefore start setting up a system to restrict certain pages to premium users.
The idea is to add a premium_until DateTime attribute which will contains validity date of the premium account. So we add this column for the users table.
rails g migration add_premium_until_to_users premium_until:dateThis command will generate this migration:
# db/migrate/20190116132207_add_premium_until_to_users.rb
class AddPremiumUntilToUsers < ActiveRecord::Migration[5.2]
  def change
    add_column :users, :premium_until, :date
  end
end
Since we are generous we will also create an additional migration to offer one month to all existing users:
rails g migration offer_one_monthspremiumto_usersWe're just looping through all the existing users
# db/migrate/20190116132207_add_premium_until_to_users.rb
# ...
def up
  premium_until_offer = DateTime.now + 1.month
  User.all.each { |user| user.update! premium_until: premium_until_offer }
end
There you go.
Creation of the premium logic
We now have a nice premium_until column who contains the validity date of the premium account. We want to create a User#increment_premium method who will be called when a payment is received. This one will simply add one month to the premium_until attribute.
Let's create the unit tests that define the expected behavior of this function. This method is very important so we will cover all possible cases:
- when the user already has a balance of days
# test/models/user_test.rb
test 'should offer one month premium to user' do
  user = User.create!(
    premium_until: (Date.today + 5.days)
    # ...
  )

  assert_equal (Date.today + 1.month + 5.days), user.premium_until
end- when the user does not yet have a day balance
# test/models/user_test.rb
test 'should set correct premium_until for never premium user' do
  user = User.new
  user.increment_premium
  assert_equal (Date.today + 1.month), user.premium_until
end- checks that we add one month from today for a user who has just reactivated his account after an inactivity
# test/models/user_test.rb
test 'should set correct premium_until for past-premium user' do
  user = User.new(premium_until: (Date.today - 1.year))
  user.increment_premium
  assert_equal (Date.today + 1.month), user.premium_until
end
I think these tests are sufficient to cover all possible cases. We have written a lot of tests but the implementation is very short:
# app/models/user.rb
class User < ApplicationRecord
  before_create :increment_premium

  def increment_premium
    if premium_until.nil? || (premium_until < Date.today)
      self.premium_until = Date.today
    end
    self.premium_until += 1.month
  end
  # ...
end
There you go. The tests are now passing:
bin/rails test test/models/user_test.rb
# Running:

....
Restrictions actions
Implementing the restriction is really easy but let's start by writing the unit tests. We will therefore create two fixtures (fixtures are data inserted in the database in order to test the application) one representing a premium user and another representing an expired user.
# test/fixtures/users.yml
premium_advocate:
  premium_until: <%= DateTime.now + 1.month %>
  # ...

expired_advocate:
  premium_until: <%= DateTime.now - 1.month %>
  # ...
Now let's imagine a page only authorized for premium users. The test is quite easy:
- We connect a user
- You can access the page
- we check that the answer is 200 (= success) if the user is premium and otherwise we check that the user is redirected to the Stripe payment page
So here is the implementation of the tests:
# test/controllers/acts_controller_test.rb
class ActsControllerTest < ActionDispatch::IntegrationTest

  test 'should forbid get index for non-premium user' do
    login users(:expired_advocate)
    get acts_url
    assert_response root_path
  end

  test 'should get index for premium user' do
    login users(:premium_advocate)
    get acts_url
    assert_response :success
  end
  # ...
end
If you run the tests at this point you will get a pretty mistake like that:
ActsControllerTest#test_should_forbid_get_index_for_non-premium_user
Expected response to be a <3XX: redirect>, but was a <200: OK>
Implementation to get it through is quite easy. Simply create a method that will verify that the premium_until attribute of the connected user is greater than DateTime.now. Then simply call this method using a controler hook. The is the code:
# app/controllers/acts_controller.rb
class ActsController < ApplicationController
  before_action :redirect_if_not_premium, only: %i[index]
  # ...

  private

  def redirect_if_not_premium
    redirect_to root_path if current_user.nil? or current_user.premium_until < DateTime.now
  end
end
The
current_usermethod allows me to retrieve the user connected to the application. To implement it, I recommend that you use Authlogic
There you go. The test should now pass! The creation of the logic for the user mode is now complete. Let's move on (finally) to Stripe!
Punctual payment
We set up logic to restrict some pages to premium users. We also created the method who will add one month of premium account to a user. All that remains is to call this method when a payment is made.
First of all, to use Stripe, you need to create an account that will allow you to get an API key. Once this is done, integration into your Rails application is pretty easy thnaks to Stripe's gem! Of course we'll use it here.
So let's start by adding this gem to our project:
bundle add stripeIn this first version we will simply set up a Stripe punctual payment and call User#increment_premium if everything goes well. In Stripe terms, a simple payment is a charge.
So we will create a charges controller that will contain two actions:
newwhich will simply propose a form to paycreatewho will receive Stripe's answer
So let's generate all this with rails generate command :
rails generate controller charges new createAll we have to do now is modify the code generated by Rails. First of all, we modify routes:
# config/routes.rb
Rails.application.routes.draw do
  # ...
  resources :charges, only: %i[new create]
  # ...
end
The actions are then implemented in the controller:
# app/controllers/charges_controller.rb
class ChargesController < ApplicationController
  # display Stripe form to make a new payment
  def new; end

  #  & check all data from Sripe
  def create
    # Amount in cents
    @amount = 500

    # get customer from POST params
    customer = Stripe::Customer.create(
      email: params[:stripeEmail],
      source: params[:stripeToken]
    )

    begin
      charge = Stripe::Charge.create(
        customer: customer.id,
        amount: @amount,
        description: 'Rails Stripe customer',
        currency: 'eur'
      )
      current_user.increment_premium!
    rescue Stripe::CardError => e
      flash[:error] = e.message
      redirect_to new_charge_path
    end
  end
end
That's represent a lot of code. Let me take a look at create method:
Stripe::Customer.createwill register the user on Stripe. Stripe will take care of all the checks for us (card validity, information transmitted, etc...)Stripe::Charge.createwill create the charge and linking it to the customer we just created- We call the
increment_premiummethod to add credit to the user
It is Look very easy. Now, we modify the views a little bit and generate a form:
<!-- app/views/charges/new.html.erb -->
<h1>Subscribe to a monthly subscription</h1>
<p>Currently, your premium account is available until <%= current_user.premium_until.strftime('%d/%m/%Y') %></p>
<%= form_tag charges_path do %>
  <script src="https://checkout.stripe.com/checkout.js" class="stripe-button"
          data-key="<%= Rails.application.secrets.stripe[:publishable_key] %>"
          data-description="A month's subscription"
          data-amount="500"
          data-locale="auto"></script>
<% end %>
<!-- app/views/charges/create.html.erb -->
<h1>Votre paiement a été accepté</h1>
<p>Le paiement a été effectué. Votre compte premium à été étendu au <%= current_user.premium_until.strftime('%d/%m/%Y') %></p>We end with configuration. Simply retrieve the API keys via the Stripe interface and add them to the secrets.yml file.
# config/secrets.yml
development:
  stripe:
    publishable_key: pk_test_azerty
    secret_key: sk_test_clef_a_ne_pas_commiter

test: &development

production:
  stripe:
    publishable_key: pk_live_azerty
    secret_key: sk_live_clef_a_ne_pas_commiter
Of course you must enter your own* key here
And now to create the necessary configuration in a Stripe-specific initializer:
# config/initializers/stripe.rb
Rails.configuration.stripe = {
  publishable_key: Rails.application.secrets.stripe[:publishable_key],
  secret_key: Rails.application.secrets.stripe[:secret_key]
}

Stripe.api_key = Rails.application.secrets.stripe[:secret_key]
Once the first version is implemented, it is enough to test that everything is going well.
At the risk of disappointing you, I didn't invent anything and I almost pumped it all out of Stripe's guide.
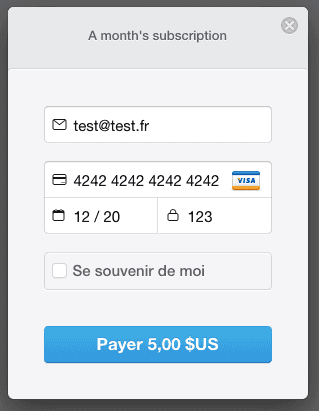
To test, launch the Rails server and connect to http://localhost:3000/charges/new. A button will take you to Stripe's form:
Formulaire de paiement de Stripe
I have voluntarily used the card number 4242 4242 4242 4242 4242 4242 which is a test card. Some credits cards numbers allow you to simulate errors. The complete list of test cards is available here
Once the form has been sent, you are redirected to the charges#create page which confirms your purchase. You can find the payment on Stripe in the section payments:
Formulaire de paiement de Stripe
Save user's cutomer_token
We will make a small modification to the implementation proposed by Stripe. We want to save the customer created by Stripe in order to reuse it if he pays again. We will therefore add a column users.stripe_token.
rails g migration add_stripe_token_to_users stripe_token:stringNous allons créer un concern qui va s'occuper de récupérer ou créer un customer Stripe:
If you are not comfortable with concerns, I talk about it in this previous article.
# app/controllers/concerns/stripe_concern.rb
module StripeConcern
  extend ActiveSupport::Concern

  protected

  # Try to retreive Stripe customer and create if not already registered
  # @params [User]
  # @return [Stripe::Customer]
  def create_or_retrieve_customer(user)
    customer = retrieve_stripe_customer(user)

    if customer.nil?
      customer = Stripe::Customer.create email: params[:stripeEmail], source: params[:stripeToken]
      user.update! stripe_token: customer.id
    end

    customer
  end

  private

  # @params [User]
  # @return [Stripe::Customer|Nil]
  def retrieve_stripe_customer(user)
    return nil if user.stripe_token.nil?

    begin
      customer = Stripe::Customer.retrieve user.stripe_token
      return customer
    rescue Stripe::InvalidRequestError
      # if stripe token is invalid, remove it!
      user.update! stripe_token: nil
      return nil
    end
  end
end
It is now time to modify a little our controller to use it.
# app/controllers/charges_controller.rb
class ChargesController < ApplicationController
  include StripeConcern
  # ...

  def create
    # Amount in cents
    @amount = 500

    customer = create_or_retrieve_customer(current_user)

    begin
      charge = Stripe::Charge.create(
        customer: customer.id,
        amount: @amount,
        description: 'Rails Stripe customer',
        currency: 'eur'
      )
      current_user.increment_premium!
    rescue Stripe::CardError => e
      flash[:error] = e.message
      redirect_to new_charge_path
    end
  end
end
There you go! The operation is identical but now we get the customer back if he already exists. We can also do without the Stripe button if the user already has a token:
<!-- app/views/charges/new.html.erb -->
<h1>Subscribe to a monthly subscription</h1>
<p>Currently, your premium account is available until <%= current_user.premium_until.strftime('%d/%m/%Y') %></p>
<%= form_tag charges_path do %>
  <% if current_user.stripe_token %>
    <%= submit_tag 'Payer avec votre compte Stripe' %>
  <% else %>
    <script src="https://checkout.stripe.com/checkout.js" class="stripe-button"
            data-key="<%= Rails.application.secrets.stripe[:publishable_key] %>"
            data-description="A month's subscription"
            data-amount="500"
            data-locale="auto"></script>
  <% end %>
<% end %>
Subscription
Don't give up, we're almost done. One of the last features to be created is to offer a subscription. The user will be able to make a subscription that will trigger an automatic payment at the beginning of the month. According to Stripe this is called a subscriptions.
Each plan is attached to a product who represents (...) the service provided to customers. Products can have more than one plan, reflecting price and duration variations - such as monthly and annual prices at different rates. There are two types of products: goods and services (...) which are intended for subscriptions.
Creating plan
So let's create our first product using Stripe's gem. Here is an example with the Rails console (You can do the same thing using the administration interface).
2.6.0 :001 > product= Stripe::Product.create name: 'Premium account subscription', type: 'service'
 => #<Stripe::Product:0x3fe4f20a1420 id=prod_EMb13PJreiAcF2> JSON: {
2.6.0 :002 > plan = Stripe::Plan.create amount: 5000, interval: 'month', product: product.id, currency: 'eur', id: 'premium-monthly'
 )
  => #<Stripe::Plan:0x2ab3e0b46d24 id=premium-monthly> JSON: {
Here again I didn't invent anything, everything is in Stripe's documentation
So we get a pretty Ruby instance corresponding to a Plan. We will just write thet id into the secret.yml file:
# config/secrets.yml
development:
  stripe:
    premium_plan_id: premium-monthly
    # ...
Creating logic
As we have created a charges controller, we will create a new one named subscriptions with two methods:
newwhich will simply propose a form to paycreatewho will receive Stripe's answer
Let's use the rails generate command once again
rails generate controller subscriptions new createWe have to modify generated routes a little bit:
# config/routes.rb
Rails.application.routes.draw do
  resources :subscriptions, only: %w[new create]
  # ...
end
Implementation of SubscriptionsController is almost identical to the ChargesController (that's why we previously created a concerns to avoid code duplication). We just need to call the method Stripe::Charge.create:
class SubscriptionsController < ApplicationController
  include StripeConcern

  before_action :check_login
  before_action :only_advocates

  def new; end

  def create
    customer = create_or_retrieve_customer(current_user)

    begin
      Stripe::Subscription.create(customer: customer.id, items: [{ plan: Rails.application.secrets.stripe[:premium_plan_id] }])
    rescue Stripe::CardError => e
      flash[:error] = e.message
      redirect_to new_subscription_path
    end
  end
end
And views:
<!-- app/views/subscriptions/new.html.erb -->
<h1>Subscribe to a monthly subscription</h1>
<p>Subscribe to reload your account automatically every month</p>
<%= form_tag subscriptions_path do %>
  <% if current_user.stripe_token %>
    <p class="text-center">
      <%= submit_tag t('premium.pay'), class: 'btn btn-primary btn-lg' %>
    </p>
  <% else %>
    <script src="https://checkout.stripe.com/checkout.js" class="stripe-button"
        data-key="<%= Rails.application.secrets.stripe[:publishable_key] %>"
        data-image="<%= image_url 'favicon.png' %>"
        data-name="iSignif SAS"
        data-description="Compte premium pendant un mois"
        data-email="<%= current_user.email %>"
        data-locale="auto"></script>
  <% end %>
<% end %>
<!-- app/views/subscriptions/create.html.erb -->
<h1><%= @title %></h1>
<p>Le débit préautorisé est maintenant configuré</p>There you go. We can now take out a subscription.
Setting up the Webhook
We have set up a monthly payment but we want to be notified of the payments made. In our case, the workflow type is as follows:
- the user makes a subscription request
- Stripe creates a subscription for this user
- when the subscription is renewed (i.e. when Stripe invoices the customer and it is re-invoiced).
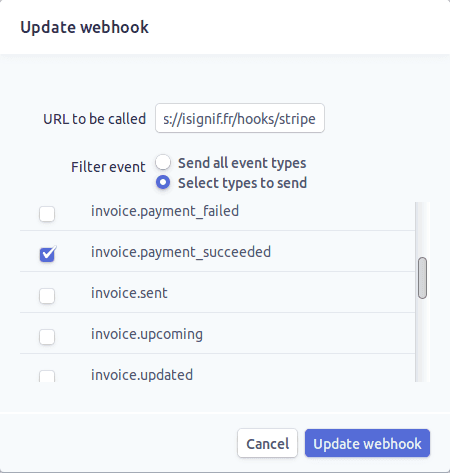
Stripe sends a request to report that the payment has been made through the hook. Webhooks are simply routes that we make available to receive requests from Stripe. Once the route is created, we must communicate the URL to Stripe via the Stripe administration interface (this is very easy).
Formulaire de création d'un Webhook
Note that I have chosen to receive only the signal
invoice.payment_succeededthat is sent when an invoice is paid. Once again I'm not making anything up, everything is in Stripe's documentation
Let's generate a route with Rails.
rails g controller hooks stripe --no-assets --no-helperWe will just delete views created by Rails and pass accessible route with the HTTP POST verb:
rm -r app/views/hooks# config/routes.rb
Rails.application.routes.draw do
post 'hooks/stripe'
# ...
endNow it is enough to add a method in the controller that will receive Stripe's request, as usual, let's start with the tests.
Functional tests
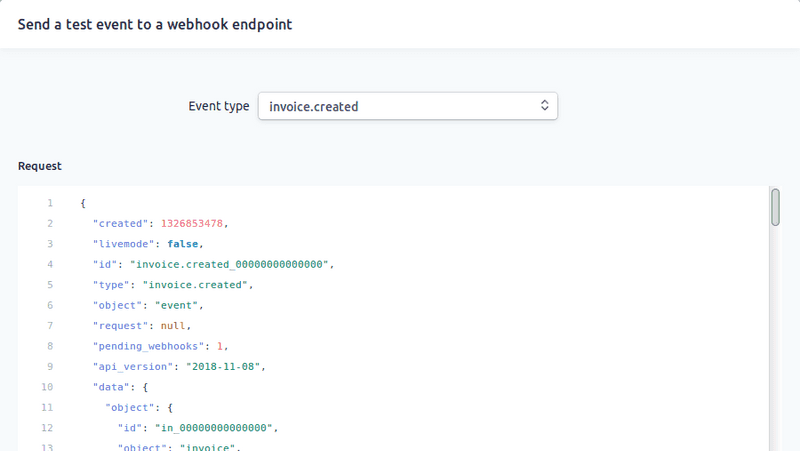
It is always complicated to test API integration so I simply chose to simulate a request from Stripe and check if our controller adds credit to the user. To do that I simply copied/pasted the parameters sent by Stripe via theirwebhooks test interface.
Test d'envoie d'un Webhook via l'administration
Once the request was copied, I transformed it into a Ruby Hash and keep only parameters that interest me.
# test/controllers/hooks_controller_test.rb
# ...
class HooksControllerTest < ActionDispatch::IntegrationTest
  # Stripe webook params copied from <https://dashboard.stripe.com/test/webhooks>
  STRIPE_INVOICE_SUCCEEDED_PARAMS = {
    id: 'invoice.payment_00000000000000',
    type: 'invoice.payment_succeeded',
    # ...
    data: {
      object: {
        customer: 'cus_00000000000000',
        # ...
      }
    },
    # ...
  }.freeze

  # ...
end
Now just send a POST request and check that our user is incremented.
# test/controllers/hooks_controller_test.rb
# ...
class HooksControllerTest < ActionDispatch::IntegrationTest
  # ...
  setup do
    @user = users(:one_advocate)
  end

  test 'Stripe hook should add premium days to the given user' do
    old = user.premium_until
    post hooks_stripe_url, params: STRIPE_INVOICE_SUCCEEDED_PARAMS
    assert_response :success
    user.reload
    assert_operator old, :<=, user.premium_until
  end
end
There you go. The implementation is fairly simple:
# app/controllers/hooks_controller.rb
class HooksController < ApplicationController
  protect_from_forgery except: [:stripe]

  def stripe
    if is_payment_succeeded?
      advocate = retrieve_user

      advocate.increment_premium! unless advocate.nil?
    end

    head :ok, content_type: 'text/html'
  end

  private

  def retrieve_user
    customer_token = params.dig(:data, :object, :customer)
    return nil if customer_token.nil?

    User.where(stripe_token: customer_token).first
  end

  def is_payment_succeeded?
    params[:type] == 'invoice.payment_succeeded'
  end
end
Be careful to disable the
protect_from_forgerywhich will block requests from outside.
And that's it, our recurring payment is now in place!
Test in development
You just need to use a service like Ngrok or Serveo (I recommend the latter which is easier to use) to expose your application outdoors and then test your webhook via Stripe's webhooks test interface. I'm not going to show you here because we have already set up a test that simulates it for us.
Conclusion
I have therefore demonstrated to you through this article that it is very easy to set up a recurring payment system with Stripe. The almost perfect documentation and their gem make it really easy for us.
But Stripe's features don't stop there. Stripe also allows us to set up an invoicing system (with the generation of beautiful PDF invoices), reimbursement or even dispute management.
I think that for the creation of your application it is much smarter to delegate all payment tasks to Stripe and focus on your business.